In this comprehensive guide to Pinterest for therapists, you’ll learn everything you need to know to use the popular platform to grow your private practice and attract new clients.
Part search engine, part social media app, Pinterest boasts close to half a billion active monthly users who use it to find inspiration, ideas, and guidance on a whole host of lifestyle-related topics.
Those topics include health and well-being, making it an ideal platform to promote a counseling practice or other therapy services.
To help you get started, I created this detailed guide so that you can learn:
- Why your private practice needs to be on Pinterest.
- How to create and manage a Pinterest Business account so that you can access improved branding features and analyze the success of your Pinterest marketing efforts.
- How to create and share captivating content to attract an audience of potential clients
- Top tips and strategies for success.
Ready? Let’s get to it!
The Benefits of Pinterest for Therapists
As with any marketing channel, success on Pinterest takes time and effort, so why bother when there’s already a multitude of other ways you could promote your private practice?
The answer is simple:
Because it works.
Using Pinterest helps you attract the right audience, drive more potential clients to your website, and enhance your reputation.
Let me explain.
1. Reach Your Ideal Demographic
The key to successfully marketing your therapy practice is to reach people who are actively interested in taking care of their mental well-being and who are most likely to want the services you offer.
The fact is that audience is largely female.
As a male therapist and a man who has benefited tremendously from my own personal therapy, I really wish this wasn’t the case, but it’s true.
In the United States, 28.6% of women accessed mental health services between 2019 – 2021 (according to the latest statistics I could find) compared to just 17.8% of men.
In the United Kingdom, an alarming 66.5% of individuals referred to the NHS Talking Therapies were women.
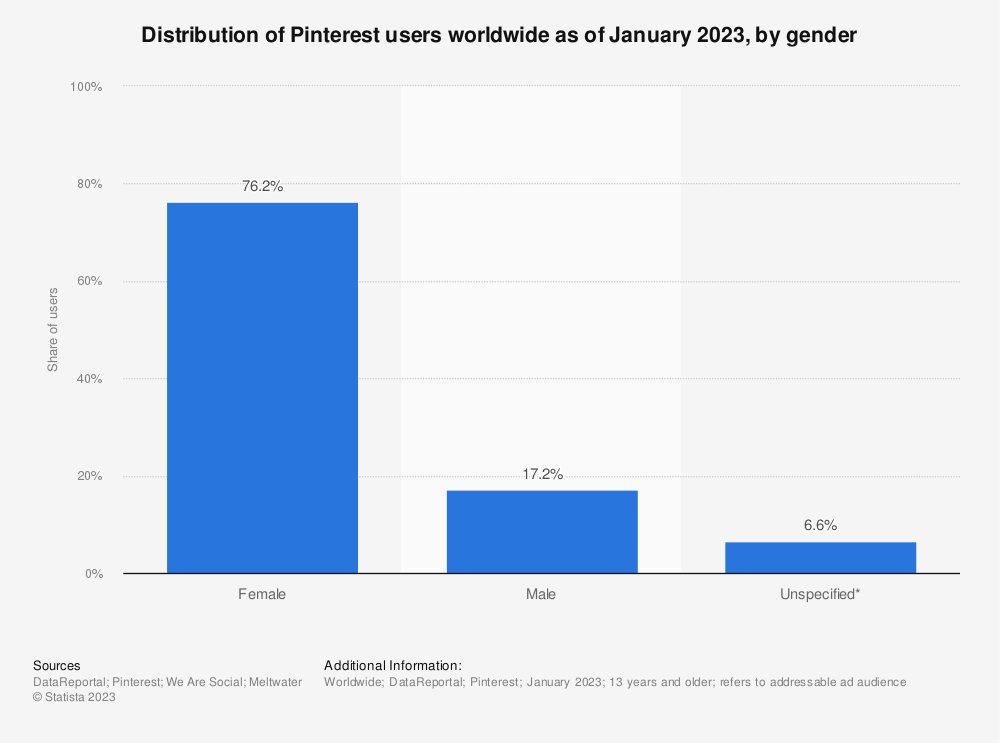
At the same time, Pinterest’s audience is also predominantly female, with women making up a whopping 76.2% of the platform’s entire user base.
Women are also more likely to use this platform to search for mental health content.
86% of Pinterest users who search for ideas on how to improve their mental health are women.

Elsewhere, 88% of women search for “mental health check-in,” and a similar number are interested in self-care ideas.
To put all this another way, if you’re going to build an audience of people who are most likely to engage with your therapy service, Pinterest can be an ideal way to do it.
2. Drive More Traffic to Your Website
The main reason why most businesses use Pinterest is to drive more visitors to their websites.
When you create a profile and add unique content to it, you can include a link from that content to specific pages on your site.
Providing your Pinterest pins is eye-catching, useful, and compelling. This is a great way to get more potential clients to visit your website, where they can learn more about your services and book an appointment.
3. Boost Your Reputation and Expertise
Successful Pinterest marketing is all about sharing high-quality content that genuinely helps your audience.
By creating this kind of content on subjects such as therapy, mental health, and self-care and linking it to more valuable resources on your website, you’ll be able to demonstrate expertise in your areas of specialty.
The more you can do to position yourself as an expert therapist, the more people trust you and want to work with you.
Not only that, but by creating original content, you can showcase your unique insights and perspectives, which can build your reputation as a thought leader, ultimately opening you up to all kinds of new opportunities, such as public speaking engagements, workshop opportunities, or even publishing a book.
Why You Need a Business Profile for Pinterest Marketing
Pinterest offers two types of accounts:
Personal and Business.
Personal is the kind of account your audience is using to search for ideas on the platform and engage with content.
Business is the kind of account you’ll use to create and share that content and engage with your audience. As a professional, this is the account you need to use.
Although setting up a Pinterest Business Profile takes a little more work than a personal account, it’s worth doing for several reasons:
- It’s free – Unless you opt to run sponsored ads, you never have to pay a penny to promote your therapy practice on Pinterest.
- Gain valuable insights into your marketing efforts – Only Pinterest Business users can access the platform’s analytics tools, which show you how many people have seen your pins and which pins are producing the best results.
These insights are invaluable for learning what’s working and what isn’t so that you can tweak your strategy to get even better results.
- Better branding opportunities – Pinterest Business accounts attach your therapy practice name and logo to every pin, boosting your brand visibility and recognition. As a business user, you can also add extra details like profile covers and board covers, which can also play an important role in raising brand awareness.
If you don’t yet have a business profile, let me show you how to create one in the following step-by-step tutorial.
How to Create a Pinterest Business Profile
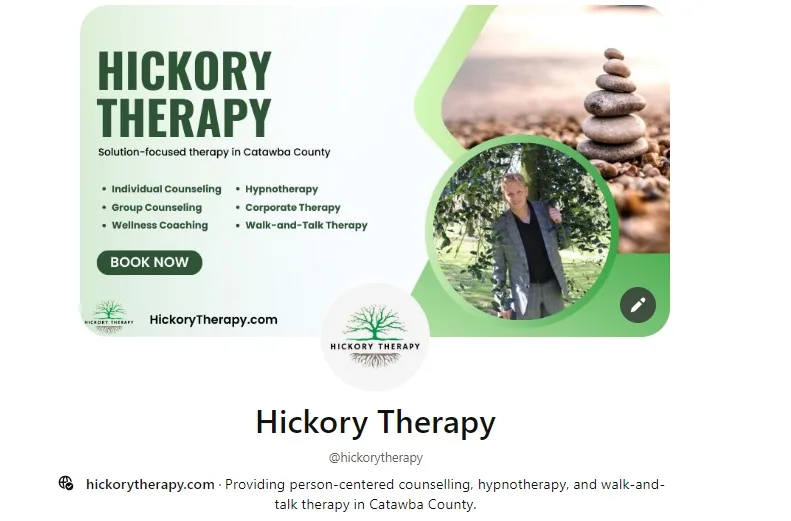
This tutorial shows you how to create a Pinterest Business profile for your private practice in 11 easy steps.
Since some of these steps have multiple parts to them, I’ve also provided links to additional tutorials if you need a more detailed explanation on what to do.
Total Time: 45 minutes
1. Head to Pinterest.com and Click ‘Sign Up’
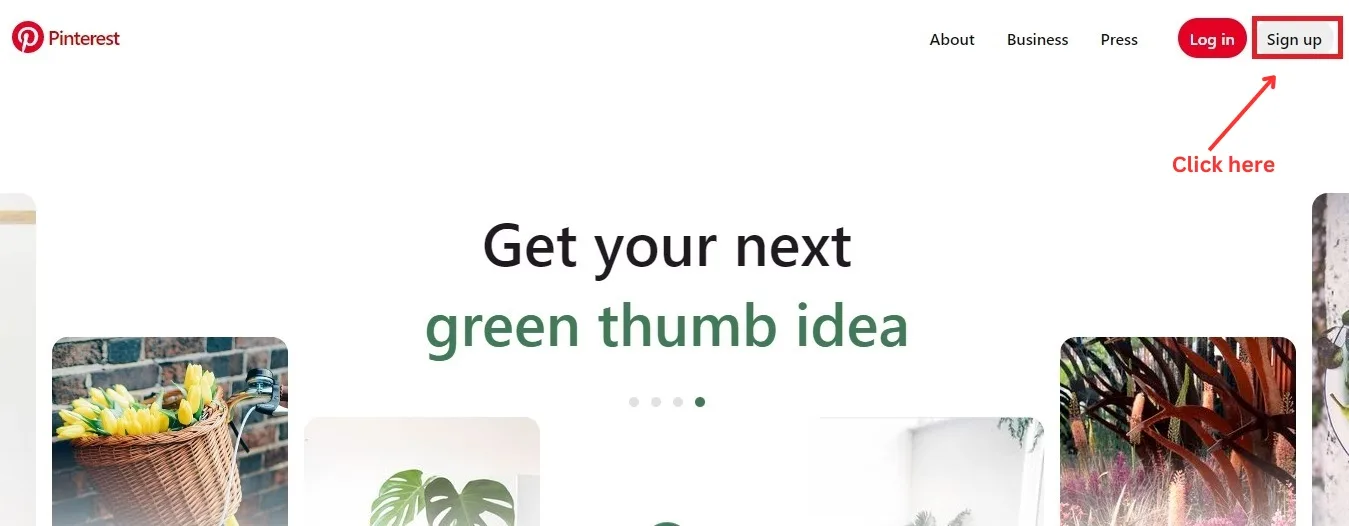
To begin, simply head to Pinterest.com and click the Sign up button in the top-right corner.
2. Choose Free Pinterest Business Account
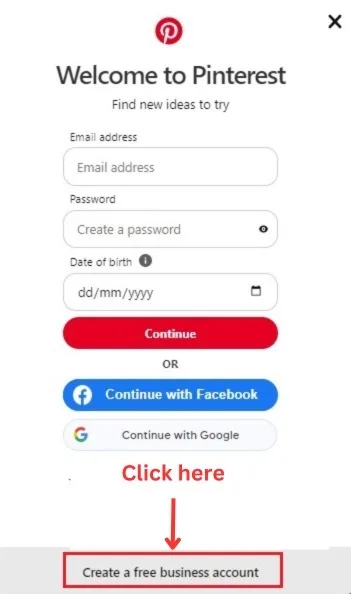
Tapping Sign Up gives you multiple options for creating a personal account, but you don’t want any of them.
Instead, skip to the bottom and click Create a free business account.
3. Create Your Account

You’ll need to enter three pieces of information to create a Pinterest business account for your therapy practice.
The first two are self-explanatory. You’ll need an email address and a secure password so that you can log into your account.
The third detail you have to enter is your birthday.
The platform collects your date of birth to help protect its younger users, which personally I’m all for.
You can find out more about Pinterest’s age verification requirements on their website.
4. Build Your Business Profile
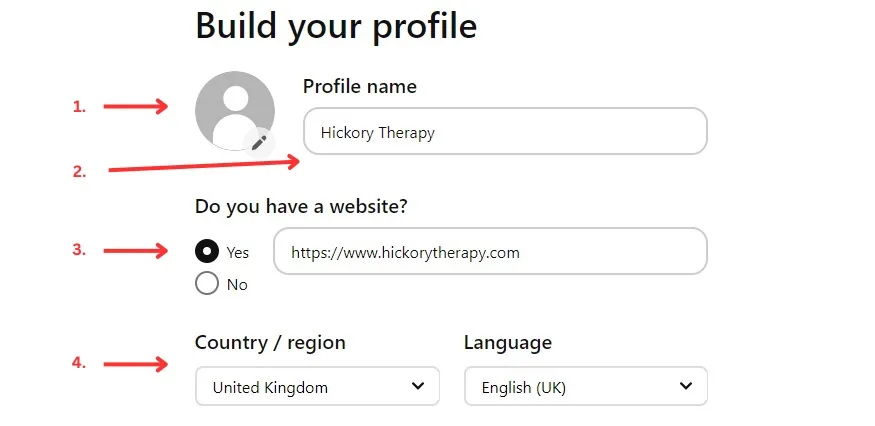
Next, you can begin to build your business profile by adding all the following details about your therapy practice:
1. Your Logo
If you don’t have one yet, you can learn how to create one in my guide to creating a therapy practice logo on Canva.
2. Your Profile Name
This should be the name of your therapy practice. So, in this example, I put Hickory Therapy.
3. Your Website
As I mentioned earlier, one of the biggest benefits of Pinterest marketing is to drive traffic to your website.
So, let’s assume that you already have a site.
In that case, ensure Yes is checked under Do You Have a Website? and then enter your URL.
4. Language and Location
This one’s pretty straightforward. What country is your therapy practice based in, and what language do you serve?
Once you’ve done all that, click Next, and let’s move on.
5. Set The Focus of Your Brand

Pinterest now wants to know a few details about your business, starting with the question What’s the focus of your brand?
In other words, what is the main subject of the content you’ll be pinning to Pinterest?
Sadly, category choices here are quite limited. There aren’t any brand options relating to therapy, mental health, or even wellness.
Here, you could argue the case for putting your practice under Health and Fitness, or possibly even Education, if you create content that helps people learn about how to manage their mental well-being.
Alternatively, you could do what I’ve done here and choose Other, then add in your own focus, such as “mental health” or “therapy practice.”
6. Set Your Business Goals
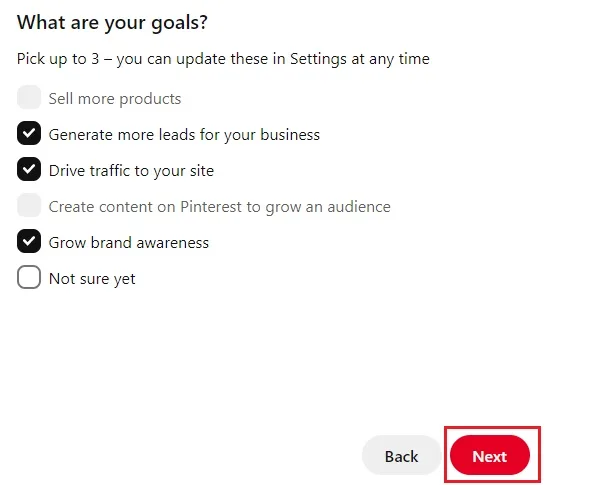
Pinterest now wants to know what goals you want to achieve by using the platform.
The idea behind setting these goals is that it helps Pinterest present you with the right business solutions to achieve them.
The goals most relevant to private practice therapists are:
– Generate more leads for your business
– Drive traffic to your site
– Grow brand awareness.
That said, if you’ve diversified your income streams by writing a book or selling downloadable worksheets, you might want to pick Sell more products in addition to two of the others.
Select the options that are right for you, then tap Next.
7. Describe Your Business
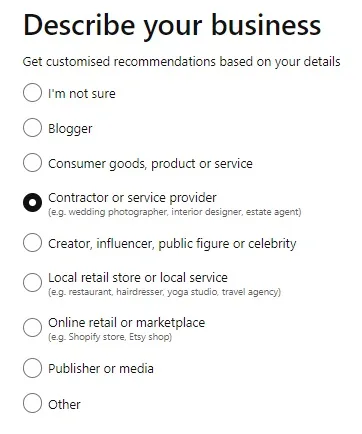
As you near the end of this onboarding process, you can tell Pinterest what kind of business you run.
Though it’s far from perfect, a Contractor or Service Provider seems the most natural fit for private practice therapists, though you could argue the case for choosing Blogger or Creator... if your main Pinterest goal is to build an audience for your mental health-related content.
Select the option that feels right to you, then hit Next.
8. Opt Out of Pinterest Ads (For Now)

Once the ‘describe your business page’ is complete, you’ll be asked if you want to run ads on Pinterest.
Ads can be a great way to grow your business, and I’d love to cover them in a future blog post, but for today, my goal is to teach you how to create your profile, so for now, let’s select ‘No, I’m not planning to advertise’.
Don’t worry; you can still use Pinterest ads later if you want to. Opting out of them for now simply means we don’t get sidetracked by setting up an ad campaign and can finish optimizing our profile.
6. Select ‘Showcase Your Brand’

You now have three options.
You can choose to either create pins, create ads, or build your profile.
Select Showcase your brand and let’s finish building your profile.
7. Optimize Your Public Profile
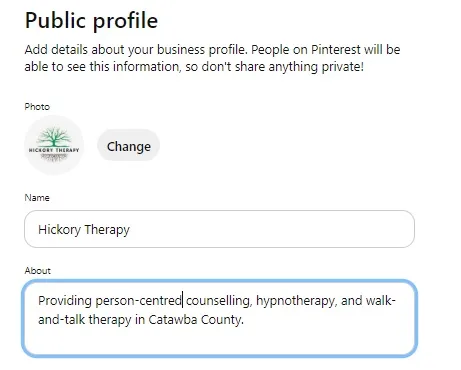
From here, you can start adding any information about your therapy practice that you want to be displayed publicly.
There’s a lot to get through with this stage, so I’ve broken it down into multiple steps for you, starting with your description.
If you only complete one part of your profile, the description should definitely be it, as it tells anybody who visits your profile who you are and what you do.
8. Set Your Web Address and Username
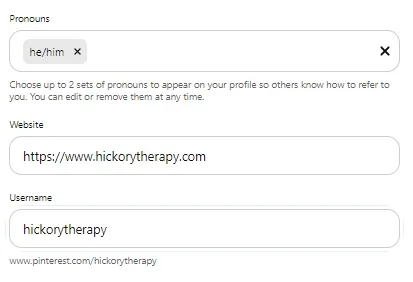
Underneath your description, you can choose whether to display your pronouns before configuring your website and username.
If you added your website during the Build My Profile process in Step 4, it should automatically be displayed here, but it’s still worth checking that it’s entered correctly.
When I got to this stage, Pinterest listed my URL with the HTTP protocol, which would direct people to an unsecured version of my site, so I changed it to the secure HTTPS version.
Below that, you can also set your username.
By default, this is set as a random stream of characters. Simply delete them and create a username.
For the sake of consistency and brand recognition, I recommend using the same username as your other social media accounts.
For example, if your Instagram and Facebook usernames are both MyAwesomeTherapyPractice, then your Pinterest username should also be MyAwesomeTherapyPractice.
9. Add Your Public Contact Details
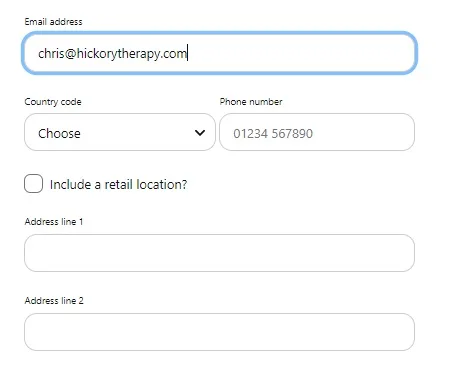
If you want to give potential clients the option to contact you directly from Pinterest, you’ll need to add some contact information.
Here, you can include:
– Email address
– Phone number
– Physical address of your therapy practice.
Adding these details is completely optional. So, if you work from home and don’t want to give your personal address away, you can always omit the address.
However, I recommend including at least an email address and, quite possibly, a phone number so that it’s easier for people to get in touch with you.
After all, the whole reason you’re doing all this is to grow your therapy practice. How are you going to do that if people don’t know how to reach you?
Add in whatever public information you want to be displayed on your profile, then click Save.
10. Claim and Verify Your Website
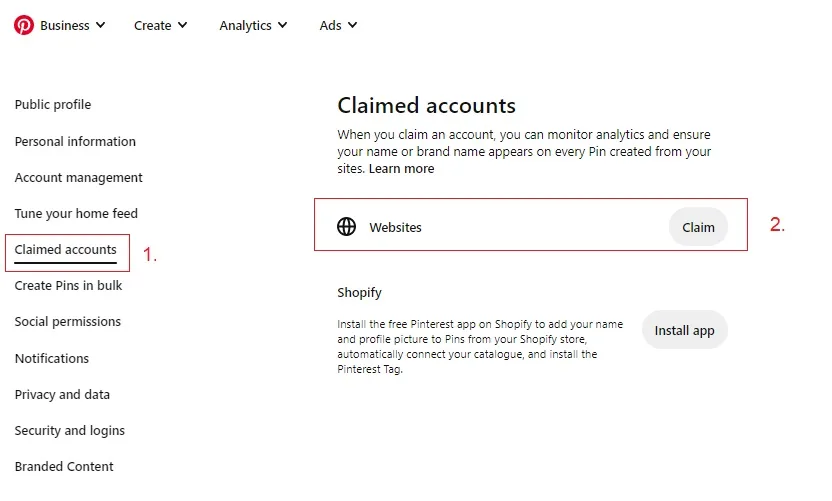
This next step is vitally important. You’re now going to claim and verify your website, integrating it with Pinterest by adding a small piece of code.
Claiming your website ensures that Pinterest shows your business name next to all pins from your website. It also allows you to use the platform’s analytics tools to track how your Pinterest marketing efforts are paying off.
To start this process, navigate to Claimed Accounts – Websites, as shown in the screenshot above.
This will present you with a new window with the code you need to copy.
If you’ve never dealt with website code before, don’t panic. Adding this code to your site is nowhere near as technical or difficult as it may seem.
The only issue is that the way you add, it will depend on what tools and platforms you’ve used to create your website. For example, popular website-building tools WordPress, Wix, and Squarespace all have different methods for adding your code.
For this reason, I’ve created a separate short tutorial called How to Claim Your Website on Pinterest.
I recommend pausing your efforts here and reading that tutorial to learn how to add the code to whichever one of the following platforms you use:
– WordPress
– Wix
– Squarespace.
If you use a different platform, Pinterest has a list of instructions that you should find helpful.
11. Add a Cover Photo

With that, all that’s left to do is to upload a cover photo for your profile.
For a truly professional look, I recommend using Canva, a free, beginner-friendly graphic design tool you can access via your web browser.
I’ve created a tutorial showing you how to create a Pinterest cover photo that shows you how to do this, but if you don’t have time for that right now, here are the steps in brief:
– Open Canva and create a custom image
– Make your image a minimum of 800 pixels x 450 pixels. For a better-quality image, I recommend increasing the size to 1600 pixels x 900 pixels
– Select and customize a template using the easy editing tools
– Download your cover photo.
To add your cover photo to Pinterest, ensure that you’re on your profile. You’ll see a large grey box with a + icon in the bottom corner.
Click that, add your photo, and that’s it. You’re done.
You’ve now successfully completed all the tasks needed to create your Pinterest Business account.
How to Add Content to Pinterest
Now that you’ve got your profile ready to go, it’s time to start using it to create and share the kind of useful content that’s going to help you grow your online presence.
Here, you’ve got three options:
1. Create and Share Your Own Pins
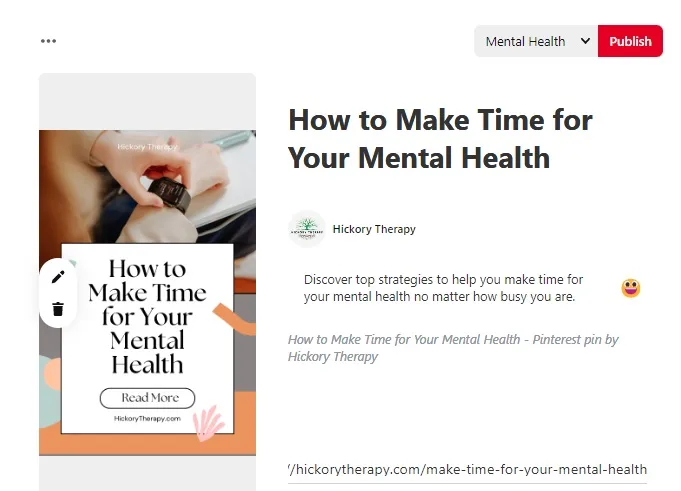
Creating and uploading your own pins is by far the most effective strategy to promote your private practice on Pinterest.
Not only is it a great opportunity to share unique content branded with your practice name, logo, and branding colors, but it also lets you provide a link back to relevant content on your website, making it a great way to drive more visitors to your site.
To do this effectively, I recommend following these tips and best practices:
- Create a unique pin for each piece of content – Every time you create a new blog post on your website, use Canva’s Pinterest pin templates to create a custom pin for it.
- Optimize your Pinterest metadata – You can add your pin by going to Create – Create Pin from your Pinterest dashboard. As well as uploading the image, be sure to add all of the following:
- A captivating title that captures people’s attention
- A description with a compelling call to action (for example, Discover the most effective way to handle panic attacks”)
- Descriptive Alt Text to help visually impaired users understand your pin when using a screenreader
- Add a URL to your content – Make sure the URL is relevant to the pin. For example, if you’re creating a pin about how to make time for mental health, it should link to a blog post or other resource on your website about that subject.
For more advice and detailed instructions on how to make and add pins, see my complete guide to creating Pinterest pins.
2. Pin Useful Media Content From Your Website
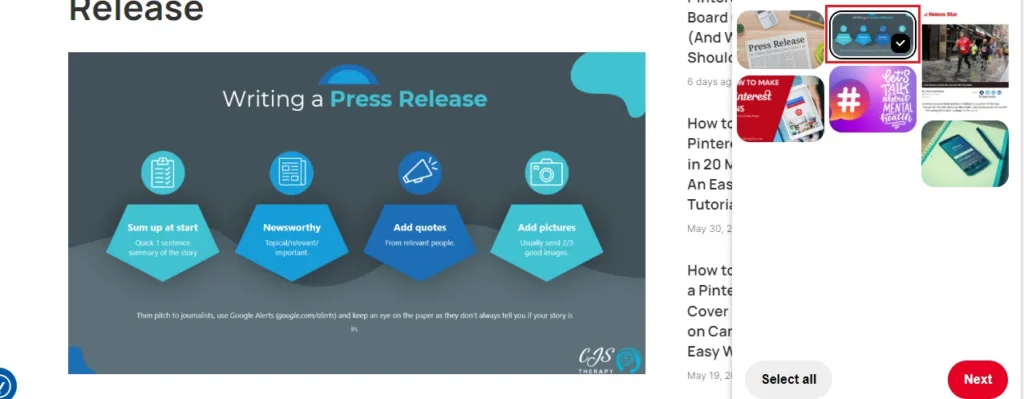
Another option is to use a Pinterest browser extension to pin other relevant and useful content from your blog posts.
For example, let’s say you made that Make Time for Your Mental Health blog post. To make that post easier to read and more visually appealing, you created infographics or maybe even included a video.
By adding that media to your Pinterest profile, you’re providing more valuable content for Pinterest users, an approach that can help you build your audience and bolster your reputation.
What’s more, when you pin content from your website, those pins will come with a link to your site, meaning more opportunities to drive traffic.
Let me quickly show you how to do this using an example from this blog.

To do this, I’m going to use the Pinterest Save button for Google Chrome.
If you use a different browser, you can also add an extension to Firefox and Microsoft Edge.
Add the extension to your browser of choice, then open up the page you want to pin content from.
For this example, I’m using my guide to creating a press release for your therapy practice.
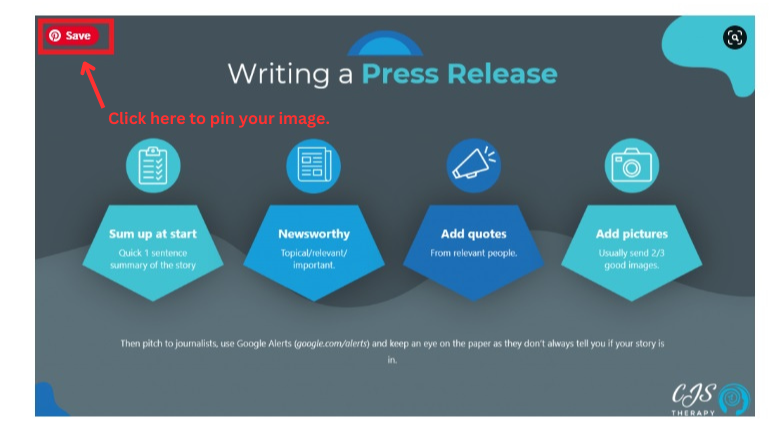
Find the image you want to pin and move your cursor over it. If you installed the extension correctly, you should find that a small, red button with the Pinterest logo and the word Save now appears in the top corner.
Click that, choose which board to save your image to, and you’re done.
TOP TIP:
Remember to only pin content that provides real value to your audience. Stock photos and other generic images used to illustrate your blogs aren’t of much interest to Pinterest users and are unlikely to get you the kind of results you want from your Pinterest marketing.
3. Share Other Valuable Content Created by Others
Finally, don’t be afraid to share content from other therapists and mental health resources that your audience may find useful.
Although this won’t do much for you in terms of driving traffic to your site, it can help develop your following as users come to rely on you to share quality content and even help you connect with other professionals to grow your practice.
5 Top Pinterest Marketing Strategies to Grow Your Practice
By now, you know how how to create your Pinterest account and the basics of making and sharing valuable content.
That’s a great start, but here are a few top tips and marketing strategies you can use to take your marketing efforts to the next level.
1. Optimize Your Pins for Relevant Keywords
A lot of people may think of Pinterest as a social media app, but the self-described “visual discovery engine” actually functions much more like search engines such as Google.
Users enter certain terms and phrases (keywords) into Pinterest to search for the content they’re interested in. These terms and phrases are called keywords, and by incorporating them into your pins, you stand a better chance of ensuring that users find your content.
To do this, you need to do a little keyword research.
How to Do Pinterest Keyword Research: Brief Tips
First, choose which page on your website you want to create a pin for, and think of the search terms people might use if they were interested in that subject.
For example, say you want to drive traffic to a post with stress-busting tips. You might come up with keyword ideas like “how to beat stress” or “reduce stress.”
Open up Pinterest and type one of those keywords into the search bar.
Pay attention to the dropdown suggestions that appear as you type. These suggestions are based on popular search queries, indicating what users are actively searching for on Pinterest.
Next, take note of the search results that appear for your initial keywords. Look for pins, boards, and accounts that are ranking well and are related to your niche.
Analyze the content, descriptions, and titles of these top-performing pins to gain insights into the keywords they are using.
Finally, you can also scroll down to the bottom of the search results page to find the “Guided Search” feature, which displays additional keyword suggestions related to your initial search query. These suggestions can help you discover related keywords that may be popular among users.
What to Do With Your Pinterest Keywords:
Now that you’ve got your keywords incorporate them into the following places when uploading your Pinterest pins:
- Pin title
- Description
- Alt text.
2. Engage With The Pinterest Community
There’s a lot to gain by using Pinterest to market your business, but as with many things in life, you’ll get more out of it when you give back.
Don’t just use Pinterest to share your own content, but use it to actively engage with other therapists and mental health communities on the platform.
Liking and commenting on others’ content will help grow your network and build relationships with other therapists while following relevant boards and accounts in the mental health niche also has the added benefit of keeping you up-to-date with emerging trends and developments.
3. Be Patient and Persistent
Like most marketing tools, Pinterest rarely produces amazing results overnight.
It takes time to build up a following and reputation on the platform. As such, you’ll need to practice patience and stick with it, publishing new content on a consistent basis and taking time out to engage with Pinterest users to help attract new followers.
4. Create Multiple Pins for Each Piece of Content
Some types of content lend themselves very well to creating multiple pins, especially lists and “top tips” style pieces.
For example, let’s say you publish a blog post called “Five Effective Ways to Manage Stress.”
You’ve got six potential pins there; one main pin for the whole blog and five additional pins, one for each of your stress management tips.
All six of these pins can be linked back to the same blog post, increasing the opportunity to drive more readers to it.
Another advantage of creating multiple pins is that it allows you to experiment with different types of titles, descriptions, and designs to see which ones get the most engagement.
These insights can help you avoid wasting time on things that aren’t working and instead focus your efforts on only posting the kind of pins you know are going to produce results.
Pinterest for Therapists: Recap and Next Steps
I hope you’ve found this therapist’s guide to Pinterest a helpful starting point for using the app to grow your private practice.
To recap, here’s a few key points to take away with you:
- Pinterest has multiple benefits for therapists – Including targeting users interested in mental health content, driving website traffic, and enhancing your reputation as an expert.
- You need a free Pinterest business account for marketing – This allows you to access useful branding and analytics tools.
- Create and share valuable content that helps people – To be blunt, nobody cares about your stock photo of a client and their therapist. They want useful content that helps them overcome problems and improve their well-being.
- Optimize your pins to get found – Use keywords in your titles, descriptions, and alt-text to ensure more people find your pins when they search for relevant topics.
Once you’re up and running, be sure to follow Therapist Marketing Tips on Pinterest to make sure you don’t miss future Pinterest guides and tips.
I’ll even follow you back to help you begin growing your audience!
Enjoyed this post? Get more marketing advice for therapists every week by following Therapist Marketing Tips on Facebook.




My brother is a therapist. & I think that’s going to help him. Thank you for sharing!
You’re very welcome!