In this guide, I’ll show you how to claim your website on Pinterest using WordPress, Wix, and Squarespace and explain why you’d want to in the first place.
I chose to focus on these three platforms because most people I speak to use at least one of the three to build their websites.
However, if your site runs on a different platform, I’ll also show you where you can find the instructions you need.
Why Should You Claim Your Website on Pinterest?
Although claiming your website can seem like a somewhat complicated process at first, it’s worth doing anyway for three key reasons:
1. Verify Ownership of Your Site
The main reason why you should claim your website is to verify that you own it.
This prevents bad actors from pretending to be you and posting unwanted or malicious content to Pinterest that looks as if it’s coming from your business.
After all, the last thing you want is for your reputation to be damaged because some nefarious ner-do-weller started sharing harmful content with your business name attached.
2. Understand the Impact of Your Pinterest Marketing
Verifying your site unlocks additional tools that you can use to bolster your Pinterest marketing, including detailed analytics that show you how well your content is performing.
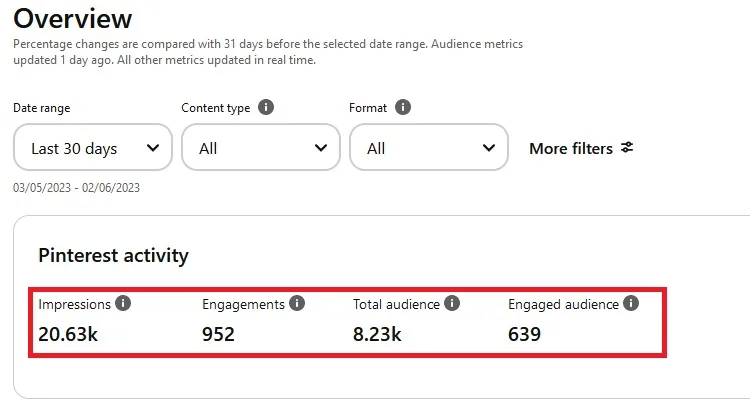
The screenshot above shows you a basic analytics overview from one of my Pinterest accounts.
Here, you can see important details including:
- Impressions – The total number of times your pins have been seen
- Engagements – The total number of times that people have interacted with your pins, such as by sharing them, commenting them, or adding them to their own boards.
- Total Audience – The total number of Pinterest users that have seen your pins.
- Engaged Audience – The total number of Pinterest users that have interacted with your content.
Elsewhere, you can also access information about which of your pins are getting the most impressions and engagements, and which ones are driving the most traffic to your website.
All this data can prove invaluable for understanding what’s working and what isn’t so that you can make informed decisions about how to tweak and refine your Pinterest marketing strategy for maximum success.
3. Greater Brand Visibility
The last time I checked, Pinterest had well over 450 million active monthly users.
That’s a heck of a lot of people creating and sharing content on the platform, meaning you’ve got a challenge on your hands if you want to stand out from the crowd.
Claiming your website helps you to overcome that challenge.
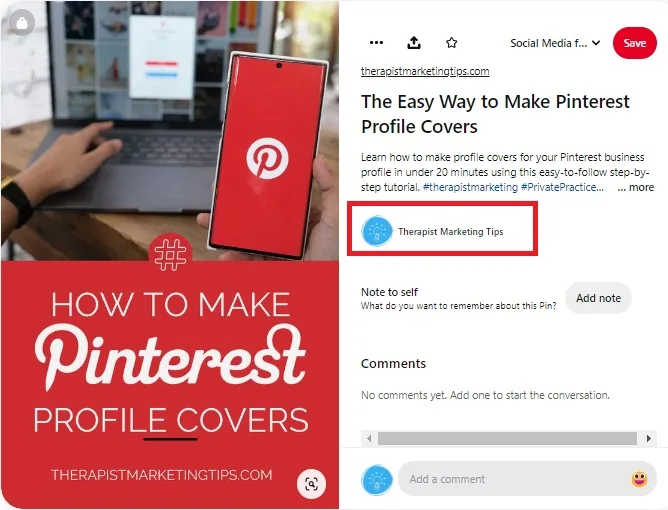
Every time a pin is uploaded that links to your verified website, your business name and profile picture will be featured right along with it.
This helps to boost brand recognition and grow your audience by making it easy for users to identify your content.
What You’ll Need to Verify Your Website On Pinterest
1. A Pinterest Business Account
Before we dive into it, I should point out that you can only claim your website on a free Pinterest business account.
If you don’t have one of those yet, you’ll find a detailed tutorial showing you how to create one in my therapist’s guide to Pinterest.
Check that out first if you need to, then come back here, and let’s begin by discussing why it pays to verify your website on Pinterest.
2. Your Own Domain Name
For this process to work, you need to own your own second-level domain name, such as TherapistMarketingTips.com or MyAmazingTherapyPractice.Net.
You can’t claim your website if it runs on a free platform where people access it using a free domain such as JohnSmith.Wordpress.com or Wix.com/MyWebsite.
Here, both WordPress and Wix are the second-level domains, and you don’t own either of them, so that’s a no-go.
You can still host your site on these two platforms, but you’ll need your own domain name in order to claim it on Pinterest.
If all that sounds a little confusing, read my guide to domain names for therapists where I explain everything in much greater detail.
How to Find the Pinterest Website Verification Code
There are two parts to verifying your website.
The first part is to grab the verification code (known as an ‘HTML Tag’) from Pinterest. This process is the same no matter whether you’re using WordPress, Wix, Squarespace, or any other platform to run your website.
So, follow these instructions first, and then read on to learn how to complete the second part, which is adding that code to your website.
1. Access Your Settings
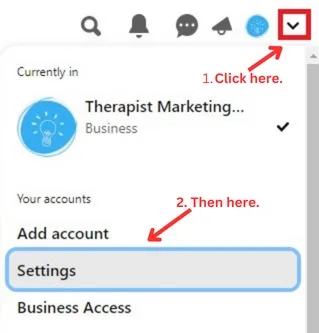
First, log into your Pinterest account and tap the downward-facing arrow in the top corner of your dashboard.
This brings up a menu of options. From this menu, tap Settings.
2. Go to Claimed Accounts > Websites > Claim
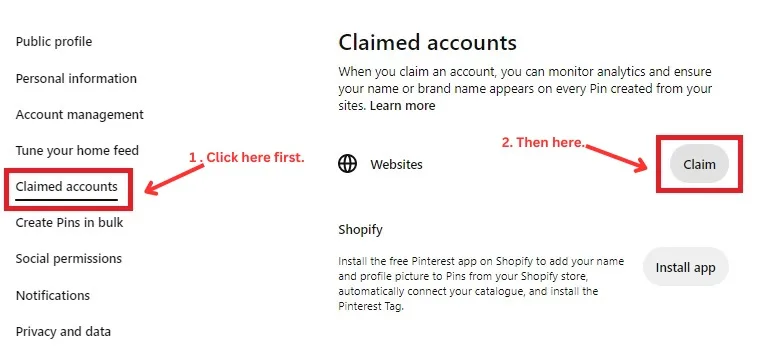
By default, accessing your settings brings you to your public profile options, with a menu on the left.
From this menu, select Claimed Accounts.
Then, next to Websites, tap Claim.
3. Copy the Code
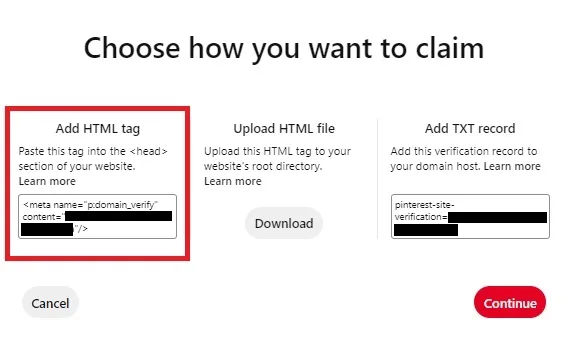
Pinterest gives you three options for verifying your site:
- Add HTML Tag
- Upload HTML file
- Add TXT record.
The easiest option is the first one, Add HTML Tag.
Click on the box containing the code that starts <meta name=…>. This will copy it to your clipboard so that it can be pasted into your website.
If you’re anything like me, you may want to paste this code into a text file to keep it safe for now.
P.S:
If you’re wondering why I’ve blacked out certain parts of the image above (and some of the images below), it’s because the blacked-out part is my unique Pinterest ID. If I showed you that, there’s a risk that somebody could use it to claim their site as belonging to my business, and we’ve already talked about what a disaster that could be.
For this reason, I recommend keeping your Pinterest code to yourself. Don’t share it with anyone unless you absolutely trust them.
Once you’ve copied your HTML tag, click Continue.
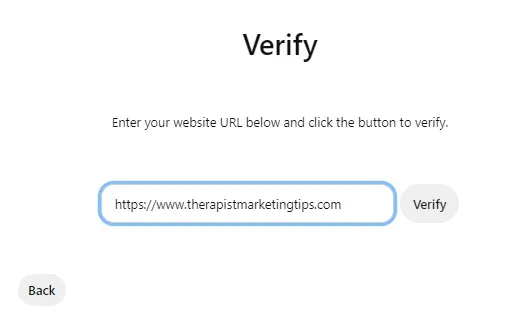
This directs you to the Verify screen. You can enter your URL in the provided box now, but – and this is very important:
Do not click the Verify button until you’ve added the code to your website. Otherwise, it won’t work.
Instead, keep Pinterest open, then open a new tab, use it to log into your website account, and use the instructions below to finish the process.
How to Claim Your WordPress Website on Pinterest
If your site runs on WordPress, I recommend adding the HTML code to your site using one of my favorite plugins, RankMath SEO.
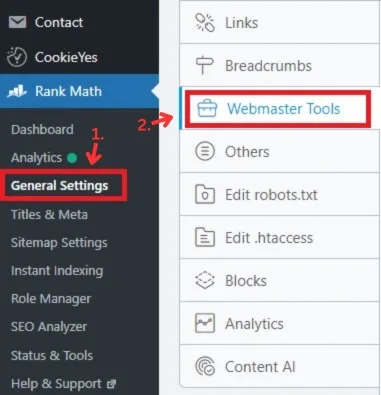
This is as simple as installing the free version of RankMath and navigating to General Settings > Webmaster Tools.
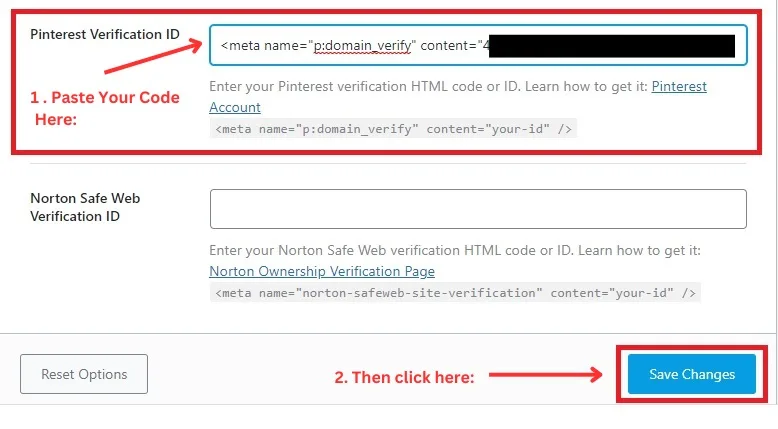
Then, scroll down to the box labeled Pinterest, paste in your code, and hit Save.
Didn’t I tell you it was easy?
Now, you can go back to Pinterest and click the Verify button.

If you’ve followed these steps exactly, you should receive the Connected message, which confirms you’ve now successfully claimed your WordPress website on Pinterest.
How to Claim Your Wix Website on Pinterest
If your website runs on Wix, log into your account and go to Marketing and SEO – SEO.
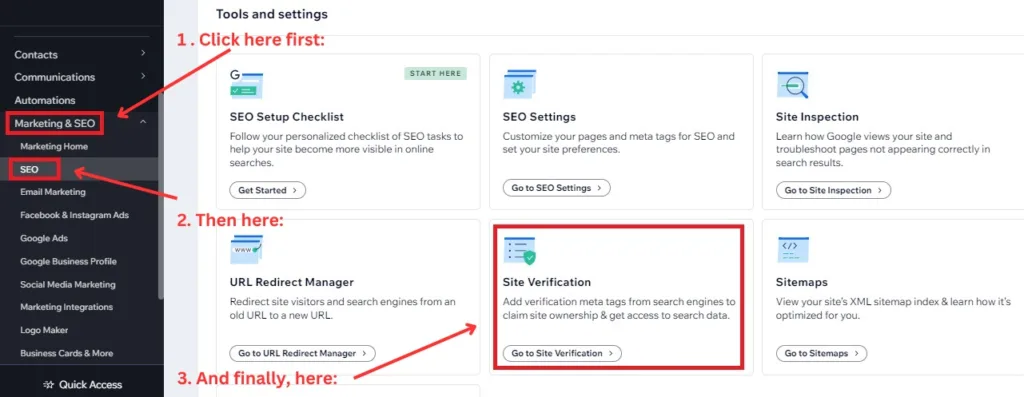
Scroll down the main SEO page until you come to Tools and Settings, and select Site Verification.
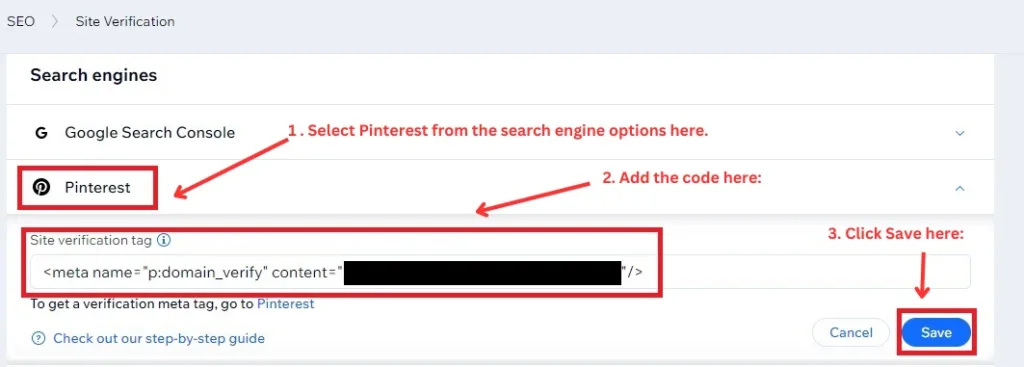
From there, select Pinterest from the list of search engines, paste your code into the box labeled Site Verification Tag, and hit Save.
Now, return to Pinterest, hit the verify button I showed you earlier, and you’re all done claiming your Wix website on Pinterest.
How to Claim Your Squarespace Website on Pinterest
To claim your Squarespace website on Pinterest, first log into your Squarespace dashboard, where your website should be listed.
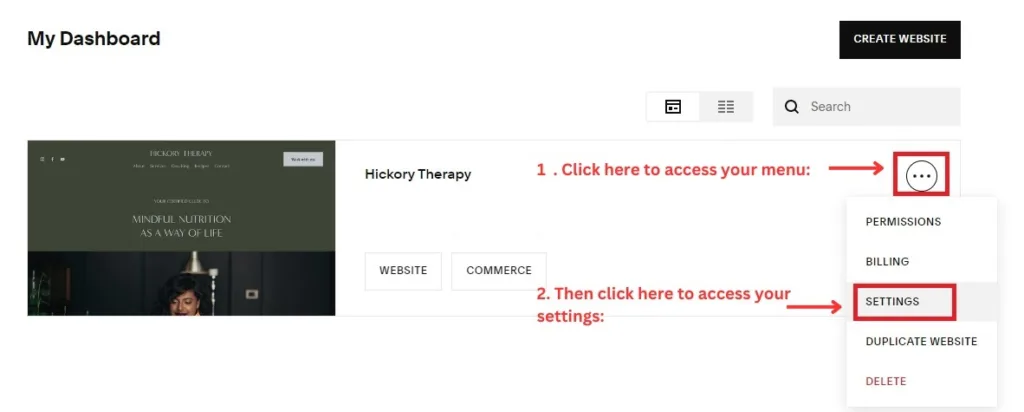
Next to your website, you’ll see a small circle with three dots in the middle Click that to bring up a menu of options for your site.
From this menu, select Settings.
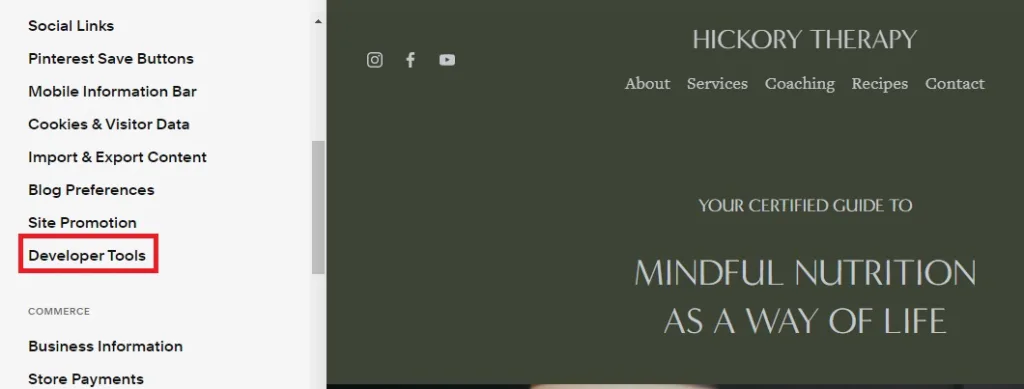
Next, click Developer Tools, which you’ll find halfway down the settings menu.
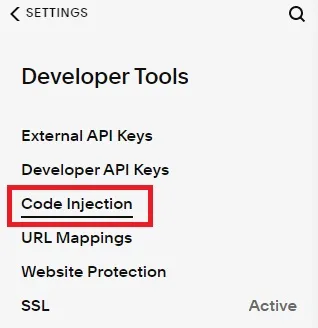
Under Developer Tools, select Code Injection.
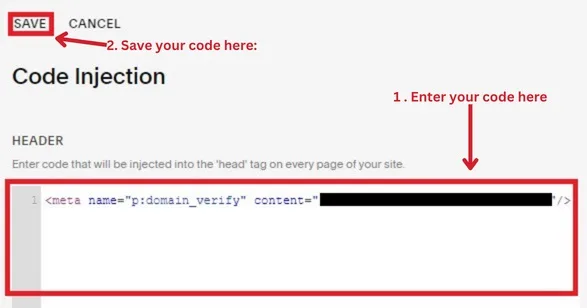
You can then enter your code into the box provided and hit save.
All that’s left to do now is to go back to Pinterest, revisit the verify your website screen (remember, it’s Settings – Claimed Accounts – Website – Verify), validate your website using the instructions I gave you at the start of this guide, and consider that a job well done.
How to Verify Your Website on Other Platforms
If your website runs on a platform other than WordPress, Wix, or Squarespace, you can still claim your website on Pinterest.
The platform itself has a database of instructions for over 20 different site builders and hosting companies.
See Pinterest’s official Claim Your Website guide to get those instructions.
How Do I Know if My Pinterest Verification Has Been Successful?
There are three ways that Pinterest confirms your verification is successful.
The first is that you’ll see the Connected message I showed you earlier under the WordPress instructions.
This displays a green tick with the phrase ‘Connected. You’re all set!‘ above your web address.
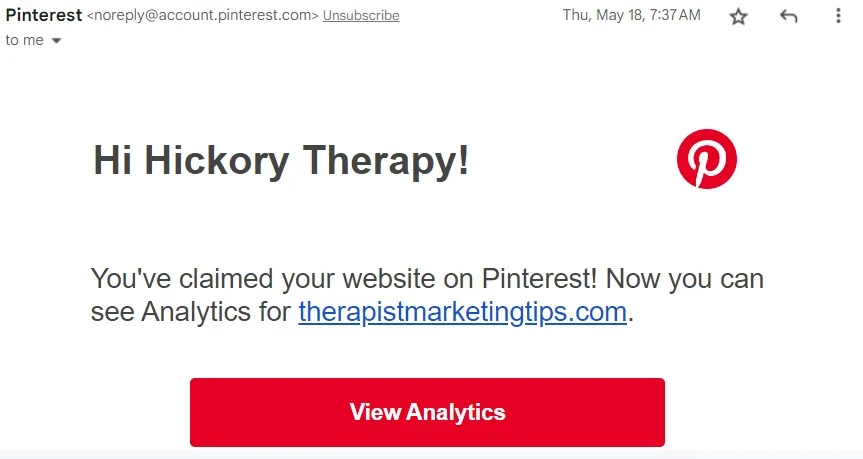
The second is that you’ll receive an email from Pinterest confirming that your website was successfully claimed.

Finally, when you visit your Pinterest profile, you’ll now see that your web address has a small icon next to it which looks like a globe with a check mark.
Hovering over this message confirms that your website has been successfully claimed and you’re now good to go.
How to Claim Your Website on Pinterest: Recap and Next Steps
If you’re a WordPress, Wix, or Squarespace user, you’ve now learned how to claim your website on Pinterest in just a couple of quick minutes.
Although the process is marginally more technical than most Pinterest marketing tasks, I hope this guide has shown you that it’s actually really easy as long as you remember the following:
- You need a Pinterest business profile and your own domain name – Personal Pinterest accounts can’t claim their website and you’ll need to own your domain name to verify it.
- Use the HTML Tag Option – You can grab your Pinterest HTML tag by going to Settings > Claim Accounts > Claim.
- Each website platform has it’s own way to verify your site – Wix, WordPress, and Squarespace all do things differently, but the instructions above show you exactly what to do.
- Don’t forget to validate your website claim – Once you’ve added the HTML tag to your site, remember to go back to Pinterest, add your URL in the Verify box and click Verify to finish the process.
With all that done, you’re now ready to start pinning content from your verified website. To learn how to do that, see How to Create Pinterest Pins.
Enjoyed this post? Get more marketing advice for therapists every week by following Therapist Marketing Tips on Facebook.