Ready to learn how to make a Facebook business page for your therapy practice but don’t know where to begin?
Let me talk you through the process in this easy-to-follow step-by-step guide.
Why Create a Facebook Business Page for Your Therapy Practice
Starting a Facebook page to promote your business and attract clients is a tremendous first step in your social media marketing journey.
Despite increasing competition from other social media platforms, Facebook’s 2.9 billion users make it the most popular one of all. As you can imagine, this gives you a potentially huge audience for promoting your practice.
The platform is also said to drive more website traffic than any other social network, which makes it ideal for turning fans and followers into paying clients.
Meta’s Suite of Tools
It’s also worth noting that Meta, the company that owns Facebook, also owns Instagram and WhatsApp.
When you have a Facebook Business account, you can use all three tools to create the kind of marketing opportunities you don’t get with your personal profile.
I’ll talk about how to make the most of those opportunities down the line but for now, let’s get your therapy practice on Facebook.
How to Make a Facebook Business Page in Less Than 20 Minutes
For the sake of this tutorial, I’m assuming that you already have a personal profile on Facebook and that you’re logged into your account.
If not, log in to your Facebook before completing the steps below.
If you don’t have a Facebook account, creating one is as simple as downloading the app to your device or visiting Facebook.com and following the sign-up instructions.
1. Visit Facebook Pages and Create a New Page
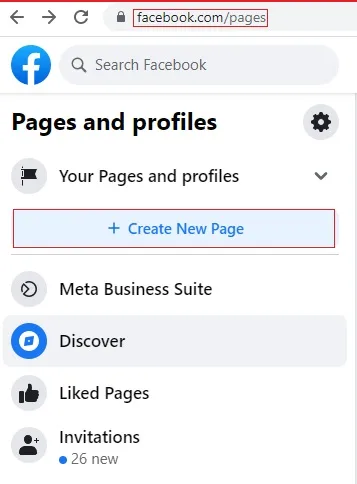
First, we need to go to the main Pages dashboard on Facebook.
The easiest way to do this is to type facebook.com/pages into your browser.
If you’re using the Facebook app for your smartphone, you can access this page by tapping your profile picture in the bottom-right corner. This brings up your main menu, and you’ll find the link to Facebook Pages halfway down, as illustrated below.
However you get there, all you have to do once you arrive is click the button labelled +Create New Page.
2. Enter Basic Information About Your Therapy Practice
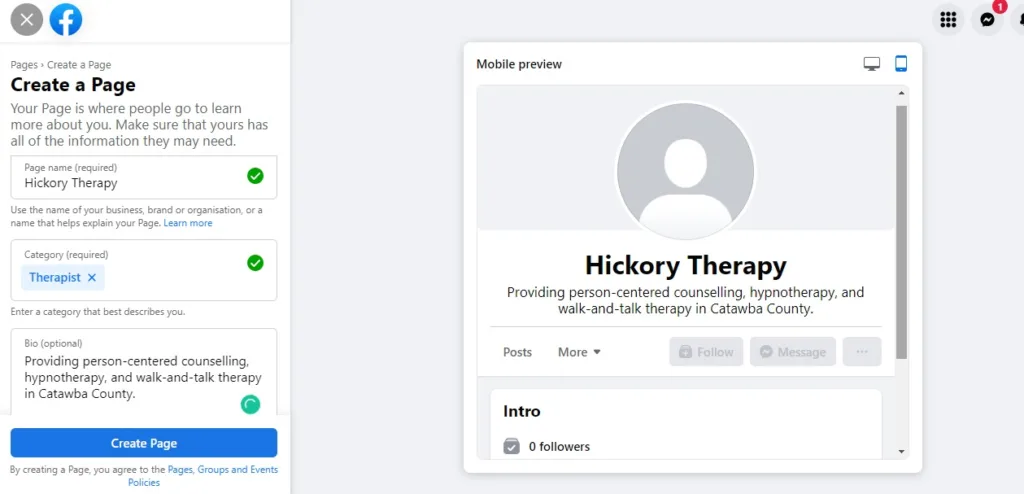
On the next page, you’ll be able to add some basic information about your business, starting with the name of your page. To make life easy, give your page the same name as your therapy practice.
Next, you’ll need to select at least one category (though preferably more) so that Facebook knows how to categorize your page to help users find it.
Unfortunately for my hypnotherapy friends, neither “hypnotherapy” nor “hypnotherapist” are available as categories. You may want to use “therapist” or possibly “alternative and holistic health service” instead.
For my counselling friends, “counselling” is a category you can use.
Other relevant categories to choose from include:
- Marriage counsellor
- Sex therapist
- Mental health service
- Coach.
Below that you’ll also want to add a brief bio that tells people what you do.
Facebook only gives you a few words for this bio, so make it short and to the point so that anyone visiting your page for the first time will understand what you do.
As you update this information, you’ll notice that the preview of your page updates in real-time so you can see exactly how it will look.
With that done, click the blue Create Page button to continue.
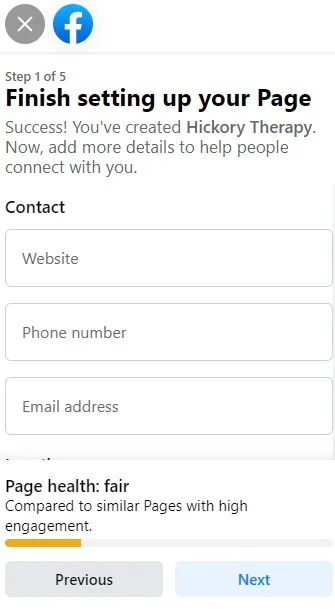
3. Enter Contact Details and Other Useful Information
You’re creating this page so that potential clients can find out about your services and get in touch to hire you as their therapist.
Naturally, then, you’re going to have to give them some way to do that.
This brings us to our next step:
Adding your contact information.
First, you’ll add your website, email address and phone number.
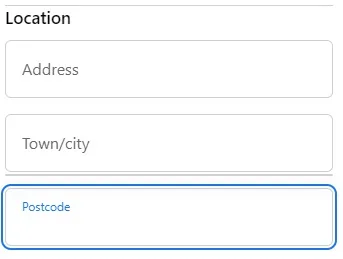
If you’re operating out of a commercial or publicly-accessible place, you may want to include your address to help people find you.
However, if you’re operating from home or want to keep your location on a need-to-know basis to ensure client safety, you can always leave this section blank.
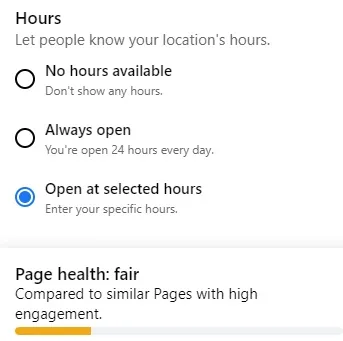
Lastly, you can choose to enter your opening hours. As with your location, you can omit this information if you prefer, but the more details you include about your practice, the greater your chance of success with your page.
About Page Health
The ‘Page Health’ bar at the bottom of this section shows you how well-optimized your page is compared to others. Ultimately, your goal should be to get that orange ‘fair’ bar to a healthy green, showing you that your page has the best chance of serving your business well.
One easy way to boost your page’s health is to add your opening hours.
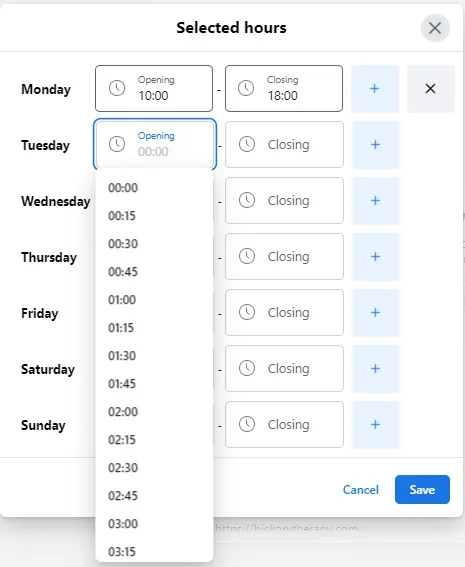
After clicking ‘open at selected hours’, you can use a drop-down menu to to enter each day’s opening and closing times manually.
When you’ve done all that, click ‘Next.’
4. Add Your Profile and Cover Images
After you’ve pressed save, you’ll have new options for adding your profile photo and cover image.
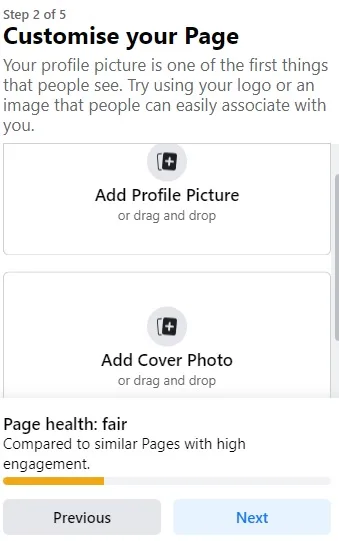
All you need to do here is to upload both photos just as you would any other on your regular Facebook account.
What to Use for Your Facebook Profile and Cover Photo
I used Canva to create both images.
I’ll no doubt tell you many times throughout this blog that I love Canva because it’s quick, easy, and free. It also offers pre-made templates specifically for cover photos, ensuring they will be the perfect size for your Facebook page.
I recently published my guide to making a therapy practice logo on Canva with step-by-step instructions so that you can make your logo the same way I did. Most of those instructions will also apply to your cover photo. To create one, select ‘Facebook Cover’ templates on Canva’s homepage instead of logo templates.
Facebook Profile and Cover Photo Sizes 2022
If you decide to make your images some other way, you’ll need to ensure they are the right size for your page. Otherwise, they may look off, pixelated, or just generally rubbish.
Facebook Page Profile Photos:
Displays at 170×170 pixels on your Page on computers, 128×128 pixels on smartphones and 36×36 pixels on most feature phones.
Your Page’s cover photo:
Displays at 820 pixels wide by 312 pixels tall on your Page on computers and 640 pixels wide by 360 pixels tall on smartphones.
It must be at least 400 pixels wide and 150 pixels tall.
It loads fastest as an sRGB JPG file that’s 851 pixels wide, 315 pixels tall and less than 100 kilobytes.
Let’s be honest:
That’s more confusing than helpful, which is why I use this handy guide from Snappa to determine what size to make my images.
My Recommendation:
I host this website on the Premium Web Hosting Plan.
This is the plan I recommend to most people because it offers more resources than the Single Website plan despite only costing £1.10 more per month. It also comes with free domain registration for one year while only costing which is very useful.
However, if you’re on a tight budget, go with the cheaper single-site plan and use my guide to domain names to get a low-cost web address to go with it.
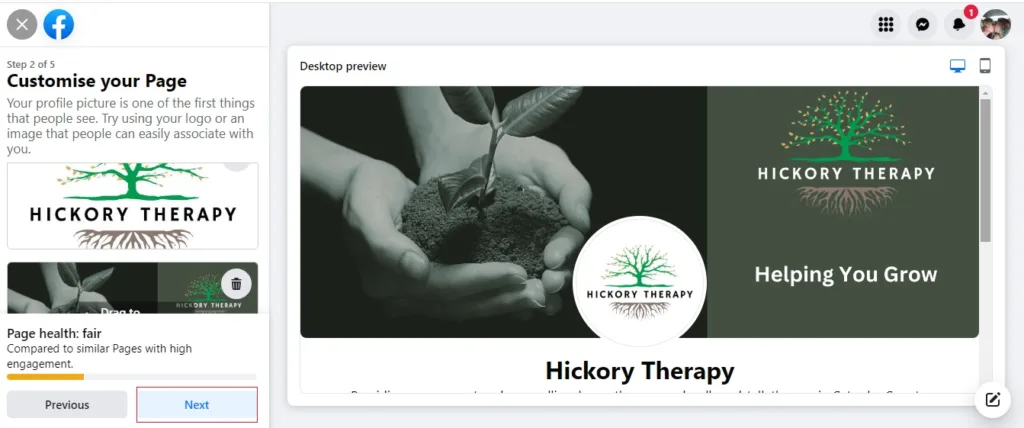
Anyway, when you’re done with all that, your page setup page should look something like this:
5. Connect to WhatsApp
Remember earlier? When I spoke about how Facebook and WhatsApp are owned and operated by the same company?
This next step allows us to take advantage of that by connecting your WhatsApp account to your therapy practice page, giving clients another way to communicate with you.
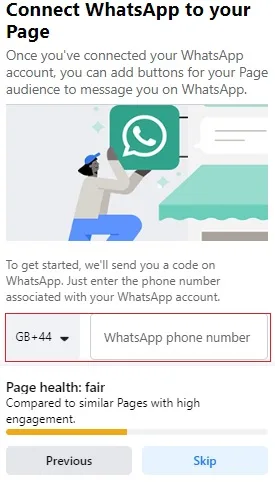
I recommend using your business phone number here rather than your personal one.
After that, you can start growing your page by inviting your Facebook friends to like and follow it. I’m not going to screenshot this part of the process for the sake of my friends’ privacy, but trust me; it’s as easy as clicking the ‘invite’ button and selecting the people you want to invite.
6. Choose Your Notification Settings
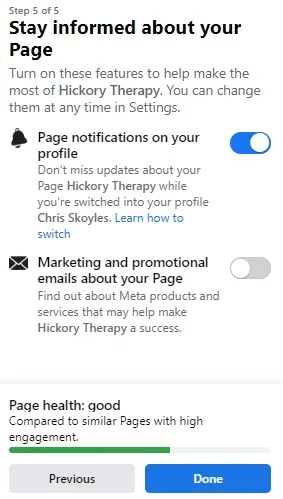
Next, you’ll get to decide what type of notifications you want to receive if any.
The first option, page notifications on your profile, means just what it says. If this is enabled, you’ll receive notifications about your business page when logged into your regular Facebook profile.
This can be very handy if you don’t want to switch between your profile and your page whenever you want to see if there’s any action.
On the flip side, one page I manage in another role gets a tonne of notifications every day, and having my personal notifications flooded with page notifications gets very annoying, very quickly.
The second option permits Meta to send you a bunch of emails. I recommend turning this off because, let’s be honest, none of us need more spam in our lives.
7. Optimize Your Therapy Practice Business Page
Your therapy practice Facebook page is technically ready to go when you’re done with all that.
From now on, you can use your page to share posts and interact with others just as you would with your personal Facebook profile.
That said, there are a few things you can do to optimize your page even further. I recommend that you so as the more you optimize your page, the more valuable it will be to you in terms of attracting and engaging potential clients.
Let’s take a look at some of the ways you can do that:
A. Add Your Service Area
Let’s say you decided earlier not to publish the address of your therapy practice on Facebook. That’s fine, but it will make it more difficult to appear in local search results.
Luckily, Facebook offers an alternative called ‘Service Areas,’ which, as you’ve probably worked out for yourself, allows you to list the general geographical areas you serve with your practice.
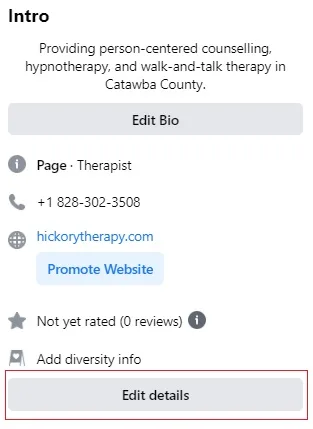
To access this, first look in the ‘intro’ box on your page and click the ‘edit details’ button.
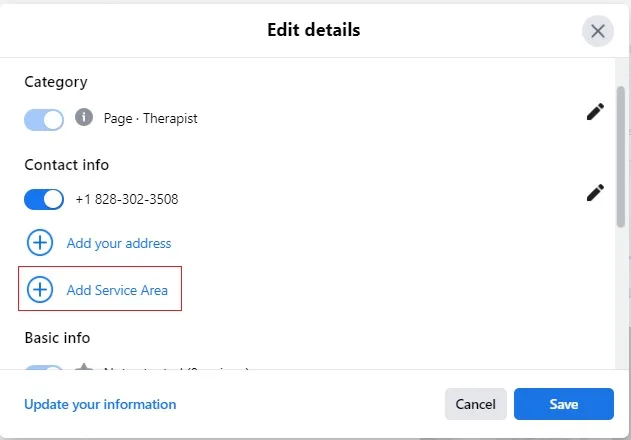
From there, scroll down and tap ‘Add Service Area.’
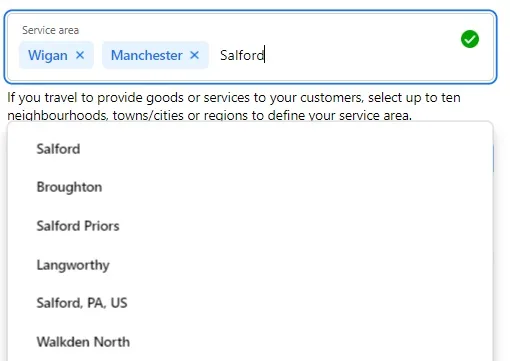
Here, you can type any and all locations where you might attract clients.
A good idea is to start with the town or city where your practice is located and then add other locations within a 20 – 30 mile radius.
If it’s reasonable to assume that clients would be willing to travel to your practice from that location, add it in.
When you’re done, remember to hit ‘Save.’
B. Add Your Social Links
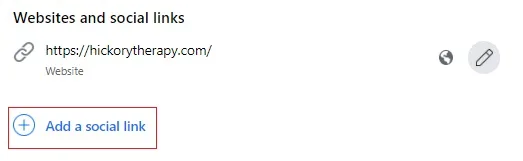
Completing your location areas will take you to the main ‘Edit Page Details’ page. Here, your next task is to scroll down to where it says Add Social Links.
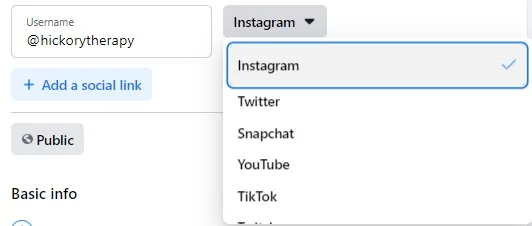
For some reason, you’ll need to click the ‘Add Social Links’ button a second time. You can then add links to your other social media profiles by selecting the platform from the drop-down menu on the right and adding your username for that platform in the box on the left.
There’s a huge array of different social media profiles you can link to here.
The ones most appropriate for practising therapists include:
- Snapchat
- YouTube
- TikTok
- Twitch
- Tumbler
- Soundcloud
- Spotify
- LinkedIn.
It’s a good idea to link to as many of these as you’re active on to help grow your followers on these other profiles and direct people to your other marketing content.
My Recommendation:
I host this website on the Premium Web Hosting Plan.
This is the plan I recommend to most people because it offers more resources than the Single Website plan despite only costing £1.10 more per month. It also comes with free domain registration for one year while only costing which is very useful.
However, if you’re on a tight budget, go with the cheaper single-site plan and use my guide to domain names to get a low-cost web address to go with it.
C. Add Diversity Information
This next Facebook page optimization task may only be relevant to some therapists, but for those to whom it does apply, it can make a massive difference to your ability to attract clients.
We all know that some clients prefer to work with therapists who share a common background or lived experience. It might be that a person from a particular ethnic group wishes to find a therapist of the same ethnicity, an LGBTQ+ individual prefers to work with an LGTBQ+ therapist, or a disabled client prefers to find a therapist living with disabilities.
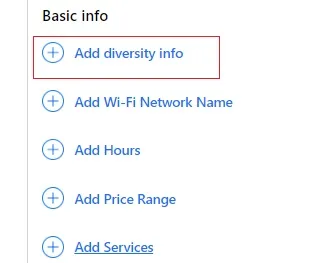
If any of these apply to you, you can include this information on your Facebook page by clicking the ‘Add Diversity Info’ tab.
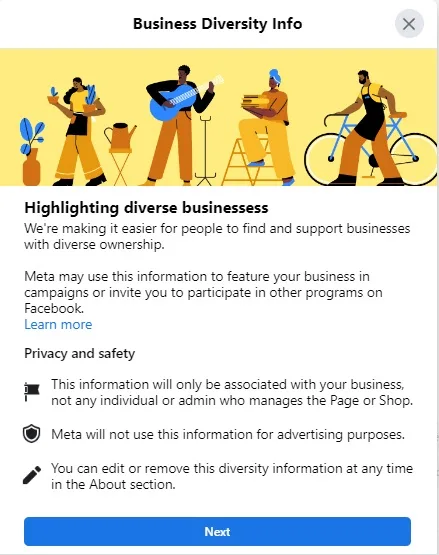
After reading the privacy and safety disclaimer around diversity, click the ‘next’ button.
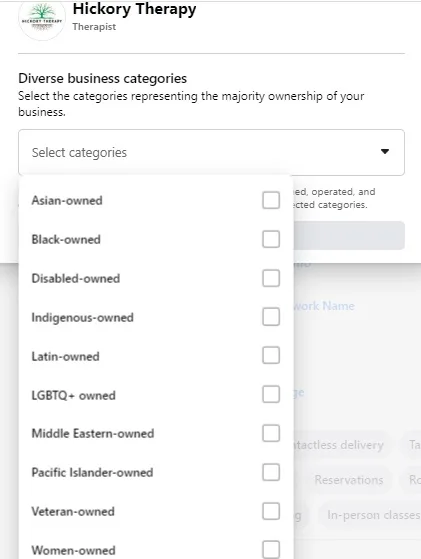
You can then use the drop-down menu to select any of the categories that are relevant to you.
D. Add Price Range
As I discussed in my guide to setting a price for your therapy sessions, money can be a very sensitive subject when it comes to therapy.
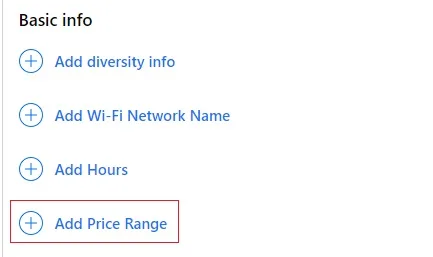
One way to manage client expectations regarding your session costs is to use the Add Price Range feature.
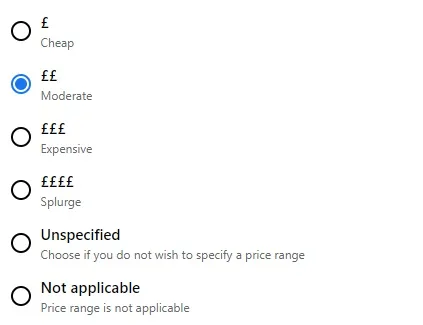
Rather than typing in your fees, Facebook allows you to simply list your prices as cheap, moderate, expensive, or splurge (luxury).
I’ve set my prices as moderate, but you can set yours at whatever price range you think is most appropriate.
E. Add a Link to Your Privacy Policy
Facebook’s terms (and most privacy laws) require all business pages to have a privacy policy.
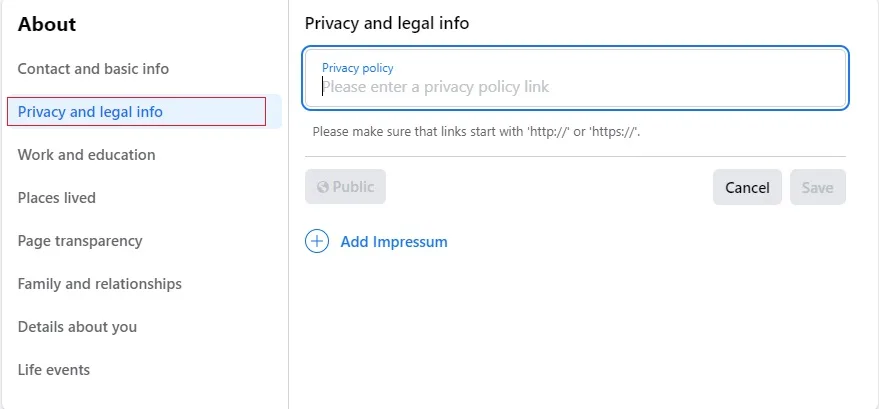
If you’ve already made a website for your therapy practice, the easiest way to add this is to go to ‘Privacy and Legal Info’ and add the URL of your privacy policy in the box provided.
If you don’t yet have a website but are planning to get one, I’d say it’s safe to wait until your site is ready and add the policy link to your page later.
While you’re waiting, you can create a free privacy policy using a tool like Termly, which will host your policy for you and provide you with a URL you can add to your Facebook page.
Auto-generated policies may not be ideal, and you’ll still need to put some work in to tailor your policy to your practice, but they’re better than nothing.
8. Create a Username for Your Page
Last but not least, your final task is to create a username for your Facebook page.
A username has two benefits:
1. It ensures your page shows up in search results when people look for your page (or even just similar pages to yours).
2. It ensures that when promoting your website, you can use a shorter URL like facebook.com/therapymarketingtips rather than the long-winded URL you first get when you set up your page.
Here’s how to create one:
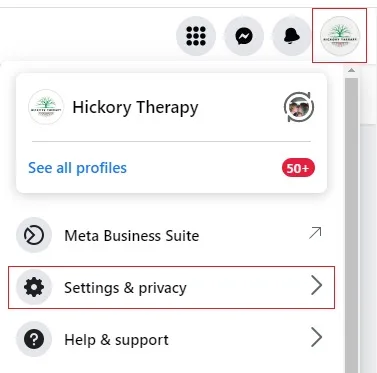
First, click on your profile photo in the top-right corner of Facebook, then select ‘Settings and Privacy.’
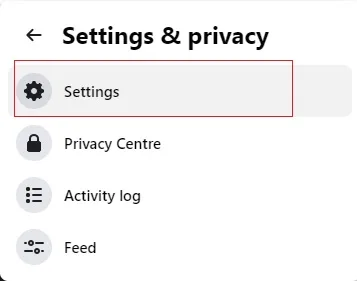
Next, click ‘Settings.’

On the General Page Settings page, look under ‘Username’ and click the link labelled ‘Edit.’
My Recommendation:
I host this website on the Premium Web Hosting Plan.
This is the plan I recommend to most people because it offers more resources than the Single Website plan despite only costing £1.10 more per month. It also comes with free domain registration for one year while only costing which is very useful.
However, if you’re on a tight budget, go with the cheaper single-site plan and use my guide to domain names to get a low-cost web address to go with it.
You can then enter your page’s username, click save, and you’re done.
Frequently Asked Questions
Should therapists have a Facebook page?
Absolutely. Having a professional Facebook page for your therapy practice allows you to market your work without blurring the professional relationship with clients in the way you would if you used your personal profile.
Can therapists advertise on Facebook?
Yes. Although there are certain guidelines you’ll need to follow, Facebook does allow therapists to advertise on the platform.
How can I get followers to my Facebook Business Page?
Begin by sharing your page with colleagues or others who may have an interest in your work. Post regular content to build up an audience, and add your Facebook username or URL to all your marketing materials.
Making a Facebook Business Page for Your Therapy Practice: Next Steps
Now that you’ve got a fully optimized Facebook business page, you can use a bunch of tools to play with that you don’t get with your personal profile.
In particular, the Meta Business Suite can prove incredibly helpful for creating and scheduling your content ahead of time, running targeted ad campaigns, and more.
I’ll be posting a guide to this suite of tools in the near future, but for now, I encourage you to explore it for yourself and have fun experimenting with different ways to use Facebook to grow your practice.
Enjoyed this post? Get more marketing advice for therapists every week by following Therapist Marketing Tips on Facebook.


Comments are closed.